Calcium Coated Shells
Written by Tim Daniels
Sometimes an egg gets coated in calcium. It looks very white and powdery on the surface of the shell. Sometimes the egg can look a pinkish colour.
Calcium coated eggs are usually caused by the egg staying in the shell gland for too long. Young hens that are stressed in some way can be susceptible to this when they are ready to lay because they will hold on to the egg for too long.
Calcium coated eggs are not normally anything to worry about and usually just appear the once from a hen with her eggs going back to normal afterwards.
Watery Egg Whites
Written by Tim Daniels
As chickens get older, the quality of the egg that they lay will deteriorate. Older
birds will lay eggs that have more watery egg whites but the most common cause
of watery whites is simply the age of the egg.
Storing eggs in high temperatures and low humidity will speed up the ageing process. Some diseases such as Infectious Bronchitis can also affect the ability of the bird to produce thick albumen (white).
You can test an egg for watery white, simply by cracking an egg onto a flat surface such as a plate and seeing how much it spreads out across the plate (or frying pan!). There is a measure of how watery eggs are where the height of the white and the weight of the egg are measured to give a measurement in Haugh between 0 and 100. The lower the Haugh value is, the more watery the white is. This measurement is only normally used in commercial egg production and the minimum value of 60 is usually required when eggs are
sold in shops. Some older hens will lay eggs well below this value.
Hatching baby chicks:
your guide to incubating fertile chicken eggs and brooding new chicks!
Nothing is more exciting that incubating your own chicken eggs! Hatching and brooding chicks is a magical experience. Learn how to discover the magic of hatching chicks yourself with this guide to hatching and brooding chicks. We'll tell you all about incubators, hatching chicken eggs, setting up a brooder, and more!
To hatch your chicks, you'll first need to get a hold of a batch of fertilized chicken eggs. If you've got your own rooster and his "harem" of hens, you can obtain your fertile chicken eggs that way. If not, you'll have to order fertile chicken eggs from a hatchery or from local hobbyists or farmers. People often post For-Sale ads for fertile eggs.
One you have your fertile chicken eggs, you'll want to incubate them as soon as possible. At the very latest, you can start incubating your fertile eggs at about 10 days after they're laid. If you're not planning on incubating your hatching eggs right away and need to store them, keep them at 50 degrees Fahrenheit with the large ends up. If you're storing your fertile eggs for longer than a couple days, you'll need to turn the eggs to keep the yolks from sticking to the egg shell.
Don't let that info about storing your fertile eggs scare you off. Many people enjoy hatching and brooding chicks, including beginners! Once you have the basics of hatching chicks down, you'll see that it is really quite simple!
You'll need an incubator to hatch your chicks. These can be purchased through a local feed store, mail-order, or even on the Internet. An incubator heats and humidifies the air to mimic the incubation process that a broody hen usually does. The best idea is to follow the instructions that came with your incubator. If you don't have your incubator's instructions, we've included some GENERAL incubator guidelines in this article. We would also suggest getting hands-on advice from our before embarking on your hatching adventure.
What kind of incubator should you get? There are many different models and types of egg incubators. The Mississippi State University says the following about egg incubators:
As the end of the three-week incubation process draws close, you'll become excited for the eggs to hatch. Channel that excitement and energy into getting ready for your eggs to hatch into chicks. The University of Minnesota says the following about preparing for your eggs to hatch:
Feeding chicks and Caring for Baby Chicks:
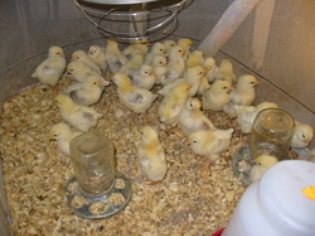
Just like human babies, baby chickens are rather fragile and delicate. You need to protect them from the cold and the house cat, as well as feeding them. If you've got a small batch of chicks, a cardboard box can serve as a fine and dandy brooder. You'll need to provide heat in the form of a heat lamp and keep it at 90 degrees Fahrenheit. You'll want to bring this temperature down by 5 degrees every week as the chicks get older.
Your newly-hatched chicks will not need to eat right after they hatch. All chicks are hatched with a bit of the egg yolk inside of them that nourishes them just as it did when they were in the egg. However, you'll need to provide food and water for your chicks soon enough. Fresh, clean waterers are important, as well as chick starter (high in protein, perfect for the little, growing chicks!).
Nothing is more exciting that incubating your own chicken eggs! Hatching and brooding chicks is a magical experience. Learn how to discover the magic of hatching chicks yourself with this guide to hatching and brooding chicks. We'll tell you all about incubators, hatching chicken eggs, setting up a brooder, and more!
To hatch your chicks, you'll first need to get a hold of a batch of fertilized chicken eggs. If you've got your own rooster and his "harem" of hens, you can obtain your fertile chicken eggs that way. If not, you'll have to order fertile chicken eggs from a hatchery or from local hobbyists or farmers. People often post For-Sale ads for fertile eggs.
One you have your fertile chicken eggs, you'll want to incubate them as soon as possible. At the very latest, you can start incubating your fertile eggs at about 10 days after they're laid. If you're not planning on incubating your hatching eggs right away and need to store them, keep them at 50 degrees Fahrenheit with the large ends up. If you're storing your fertile eggs for longer than a couple days, you'll need to turn the eggs to keep the yolks from sticking to the egg shell.
Don't let that info about storing your fertile eggs scare you off. Many people enjoy hatching and brooding chicks, including beginners! Once you have the basics of hatching chicks down, you'll see that it is really quite simple!
You'll need an incubator to hatch your chicks. These can be purchased through a local feed store, mail-order, or even on the Internet. An incubator heats and humidifies the air to mimic the incubation process that a broody hen usually does. The best idea is to follow the instructions that came with your incubator. If you don't have your incubator's instructions, we've included some GENERAL incubator guidelines in this article. We would also suggest getting hands-on advice from our before embarking on your hatching adventure.
What kind of incubator should you get? There are many different models and types of egg incubators. The Mississippi State University says the following about egg incubators:
- Fairly constant environmental conditions can be maintained in an
incubator. Incubators are available in many different models and sizes
with capacities ranging from two to thousands of eggs. The larger
incubators are rooms in which environmental conditions are carefully
controlled. There are two basic types of incubators, forced-air and
still-air incubators. The size and type of incubator selected depends on
your needs and future plans.
Forced-air incubators have internal fans to circulate the air. Eggs are
placed in stacks of trays. The capacity of these incubators is large.
Most units have automatic equipment for turning the eggs and spray-mist
nozzles for holding proper humidity levels.
Still-air incubators are usually small but may hold 100 eggs or more.
They do not have fans. Air exchange is made by escaping warm, stale air
at the top and entering cool, fresh air near the bottom. Air circulation
is limited, so only one layer of eggs can be incubated. Incubating
temperatures in these machines must be about 2 to 3oF. above the
temperatures in forced-air incubators.
If you are incubating large numbers of eggs or setting eggs more than
once weekly, use separate incubating and hatching units. The incubators
should be large enough to hold a three-week supply of eggs. The hatcher
unit can be small, but large enough to hold the largest setting of eggs.
Eggs at various stages of incubation are held in the incubator. The eggs
are transferred to the hatcher on the 18th day and held in the hatcher
until completely hatched. Clean and disinfect the hatcher after each
group of eggs hatches.
- Temperature—Maintain the temperature in the 99-102° F.
temperature range (100-101° F., if possible). Place the thermometer to
measure the temperature at a level at or slightly above where the center
of the egg will be. Overheating the embryo is much more damaging than
is underheating it; overheating speeds up embryo development, lowers the
percentage of hatchability, and causes abnormal embryos. Although a
short cooling period may not be harmful, longer periods of low
temperatures will reduce the rate of embryo development. Excessively low
temperatures will kill the embryos. Avoid temperatures outside the
97-103° F. range. If the temperature remains beyond either extreme for
several days, hatchability may be severely reduced.
Humidity—The moisture level in the incubator should be about 50 to 55
percent relative humidity, with an increase to about 65 percent for the
last 3 days of incubation. Moisture is provided by a pan of water under
the egg tray. The water surface should be at least half as large as the
surface of the egg tray. Add warm water to the pan as necessary. If more
humidity is needed, increase the size of the pan or add a wet sponge.
Humidity adjustment can also be made by increasing or decreasing
ventilation.
As the end of the three-week incubation process draws close, you'll become excited for the eggs to hatch. Channel that excitement and energy into getting ready for your eggs to hatch into chicks. The University of Minnesota says the following about preparing for your eggs to hatch:
- When the eggs are last turned, 3 days before hatch, place a
layer of crinoline or cheesecloth on the screen under the eggs. It will
make cleaning the incubator easier after hatching.
Most chicks should hatch within a 24-hour period. Late-hatching chicks
may lack vigor or be abnormal. After the chicks have dried and fluffed
up completely, they can be removed from the incubator. When most of the
chicks have hatched, you can lower the incubator temperature to about
95° F. if the chicks are to be kept in the incubator for 1 or 2 days.
Plan ahead for what you will be doing with the chicks. (Students will be
concerned about what you do with the chicks.)
Clean the incubator after the hatch, so it will be ready for the next
time. Sanitation is an important part of incubating. Remove and dispose
of the crinoline or cheesecloth, together with the shells and other
remains. Clean the inside of the incubator with soap and water, and let
it dry completely before putting it away.
Feeding chicks and Caring for Baby Chicks:
Just like human babies, baby chickens are rather fragile and delicate. You need to protect them from the cold and the house cat, as well as feeding them. If you've got a small batch of chicks, a cardboard box can serve as a fine and dandy brooder. You'll need to provide heat in the form of a heat lamp and keep it at 90 degrees Fahrenheit. You'll want to bring this temperature down by 5 degrees every week as the chicks get older.
Your newly-hatched chicks will not need to eat right after they hatch. All chicks are hatched with a bit of the egg yolk inside of them that nourishes them just as it did when they were in the egg. However, you'll need to provide food and water for your chicks soon enough. Fresh, clean waterers are important, as well as chick starter (high in protein, perfect for the little, growing chicks!).
